How to Transfer Photos From Phone to Computer: Easy Methods for Android and iPhone
Moving photos from your phone to a computer is one of the simplest ways to create a backup, free up storage, edit pictures on a larger screen, or organize years of memories. However, the best method depends on whether you use Android or iPhone, whether your computer runs Windows or macOS, and whether you prefer a cable, wireless connection, or cloud storage.
If you are searching for How to Transfer Photos From Phone to Computer, this guide covers the most practical options. You will learn how to transfer photos with a USB cable, import them through Windows, use iCloud or Google Photos, send pictures wirelessly, and troubleshoot common connection problems.
Quick Answer
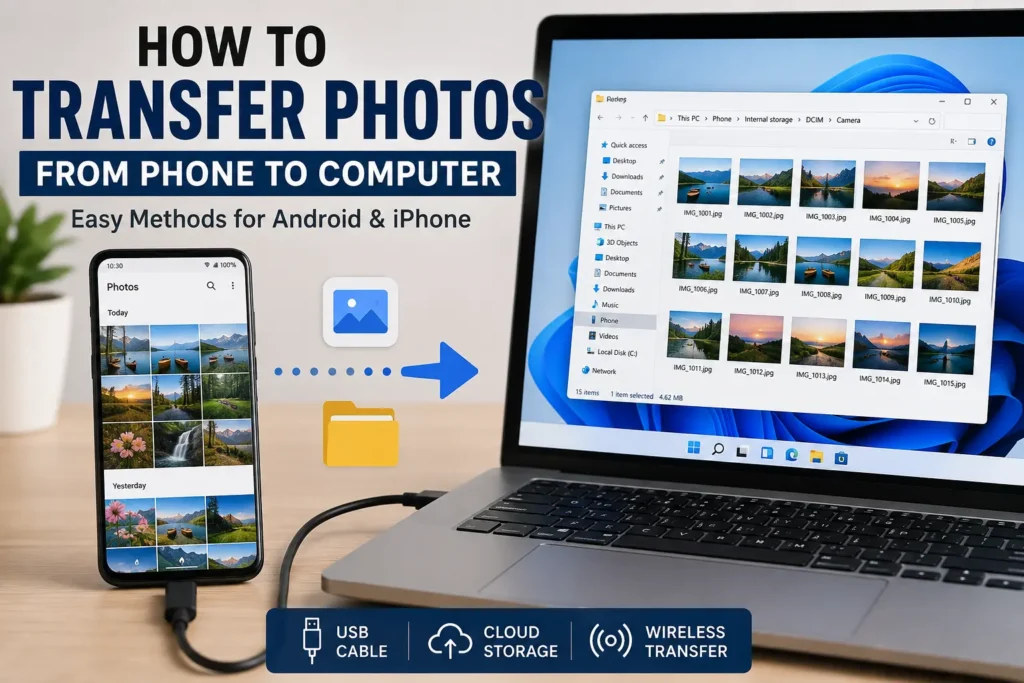
The fastest method for most Android phones is a USB cable. Connect the phone to your Windows computer, unlock the phone, select File Transfer or a similar USB option, then open the phone’s storage from File Explorer. Your camera pictures are commonly found in folders such as DCIM > Camera.
For an iPhone connected to a Windows PC, connect the iPhone with a USB cable, unlock it, tap Trust if prompted, and use the Windows Photos app or File Explorer to import or copy pictures. On a Mac, the Photos app can import pictures directly from an iPhone.
You can also transfer photos without a cable. Google Photos, iCloud, cloud storage services, and wireless sharing tools can move pictures between devices. Wireless methods are convenient, but a USB connection is often preferable when transferring a large number of original photos because it avoids uploading and downloading the files.
Why Transferring Photos From a Phone to a Computer Can Be Difficult
In principle, transferring a photo should require only a few clicks. Problems usually occur because the phone and computer handle file access differently.
Here are some common reasons users have trouble:
- The phone is locked when it is connected.
- The USB cable supports charging but not reliable data transfer.
- Android is set to charge only instead of allowing file access.
- An iPhone has not been trusted by the computer.
- Windows does not automatically open the correct import tool.
- The photos are stored in a different folder than expected.
- Cloud synchronization has not finished.
- The computer does not have enough free storage.
- The phone contains thousands of photos and the transfer takes a long time.
- Some photos are stored only in cloud storage rather than locally on the phone.
- A USB port, cable, driver, or device connection is malfunctioning.
Understanding these possibilities makes troubleshooting much easier.
How to Transfer Photos From Phone to Computer
There are several reliable ways to move pictures. Start with a USB cable if you want the simplest method for a large collection.
Method 1: Transfer Android Photos Using a USB Cable
A USB cable is usually the most direct way to transfer photos from an Android phone to a Windows PC.
Before starting, make sure the phone is unlocked and use a cable capable of data transfer.
- Connect your Android phone to the computer using a USB cable.
- Unlock the phone.
- Look for a USB notification on the phone.
- Tap the notification if necessary.
- Select File Transfer, Transferring files, MTP, or a similarly named option.
- On Windows, open File Explorer.
- Select This PC.
- Find your Android phone under connected devices.
- Open the phone’s internal storage.
- Look for the DCIM folder.
- Open Camera or another folder containing your pictures.
- Select the photos you want to copy.
- Right-click and choose Copy, or use the keyboard shortcut.
- Open a folder on your computer.
- Paste the pictures into the destination folder.
Do not immediately delete the original photos from your phone after copying them. First open several transferred pictures on the computer and confirm that the files are complete.
Where Are Android Photos Stored?
The exact folder depends on the camera app and phone manufacturer, but common locations include:
- DCIM/Camera — pictures taken with the phone’s camera
- Pictures — images saved by some applications
- Download — downloaded images
- Screenshots — screenshots
- Application-specific folders — pictures created or saved by individual apps
If you cannot find a particular picture, use File Explorer’s search features or check the app that created the image.
Method 2: Transfer iPhone Photos to a Windows PC With USB
iPhone-to-Windows transfers work differently from ordinary Android file transfers.
You can use the Windows Photos app or compatible file access after connecting the iPhone.
- Connect the iPhone to the Windows PC using a USB cable.
- Unlock the iPhone.
- If the iPhone displays a Trust This Computer? prompt, review it and choose the appropriate option to trust the computer.
- Enter your iPhone passcode if requested.
- Open the Photos app on Windows.
- Look for the import option.
- Select the connected iPhone.
- Allow Windows to scan the available photos.
- Select the pictures you want to import.
- Choose the destination and begin the import.
The exact wording and layout can change between Windows versions and Photos app updates, so the buttons may not look identical on every PC.
If you prefer manual file access, open File Explorer and check whether the iPhone appears under This PC. The available folders and file access can depend on the iPhone, Windows version, and photo settings.
Method 3: Transfer iPhone Photos to a Mac
If both your phone and computer are Apple devices, the built-in Photos app is generally the easiest option.
- Connect your iPhone to the Mac with a compatible cable.
- Unlock the iPhone.
- Follow any trust or permission prompts.
- Open the Photos app on the Mac.
- Select the iPhone from the available devices if it is not already selected.
- Review the photos available for import.
- Select individual pictures or import a larger collection.
- Choose the import option.
If iCloud Photos is enabled, some pictures may already be available on the Mac through iCloud rather than requiring a physical cable transfer.
Wireless Methods for Transferring Photos
A cable is not always convenient. Wireless methods are useful when you want to transfer a few photos, avoid cables, or move pictures between devices in different locations.
Method 4: Use Google Photos
Google Photos can be useful for transferring pictures between an Android phone and a computer, and it can also work with iPhone.
The basic process is:
- Open Google Photos on your phone.
- Make sure the pictures you need are backed up or otherwise available in your Google Photos library.
- On your computer, open Google Photos in a web browser.
- Sign in to the same Google Account.
- Find the pictures you want.
- Select the required photos.
- Use the download option to save copies to the computer.
This approach is particularly useful when you want to access your photo library from multiple devices.
However, remember that cloud storage and phone storage are not necessarily the same thing. A photo visible in Google Photos may be backed up online even if its full local copy is no longer stored on the phone.
Method 5: Use iCloud Photos
iCloud Photos is particularly useful for moving pictures from an iPhone to a Mac or Windows computer.
On Apple devices, photos synchronized through iCloud can appear in the Photos app when the same Apple Account and appropriate synchronization settings are used.
On Windows, Apple’s iCloud software can provide access to iCloud content, depending on the current software version and configuration.
The general process is:
- Make sure your iPhone is signed in to the appropriate Apple Account.
- Confirm that iCloud Photos is enabled if you want to synchronize the photo library.
- Allow the phone enough time to upload photos.
- Sign in to the corresponding iCloud service on the computer.
- Access your photos.
- Download or copy the images you need.
Cloud transfers can take longer than USB transfers if your internet connection is slow or your photo library is large.
Method 6: Use Nearby or Wireless Sharing
Some Android phones and Windows PCs support wireless file-sharing options that can transfer selected photos without a cable. Availability varies by phone manufacturer, Windows version, and installed software.
For a small number of images, wireless sharing can be much more convenient than connecting a cable.
The general process is:
- Enable the supported sharing feature on the phone.
- Make sure the computer is discoverable when required.
- Select the photos on the phone.
- Choose the sharing option.
- Select the computer.
- Accept the transfer on the computer if prompted.
- Wait until the transfer finishes.
Wireless sharing is best for smaller batches. For a large photo library, a direct cable or cloud-based synchronization may be more practical.
How to Transfer Photos From Phone to Computer Using Google Chrome
Google Chrome itself is not normally a direct replacement for a USB connection. However, Chrome is useful when your photos are stored in a cloud service.
For example, you can access Google Photos through Chrome:
- Open Chrome on your computer.
- Sign in to the Google Account containing your photo library.
- Open Google Photos.
- Select the required photos.
- Choose the download option.
- Select where you want to save the files.
This is particularly useful when your phone is not physically available or when you already use cloud backup.
Remember that downloading hundreds or thousands of photos through a browser may take considerable time and disk space.
How to Transfer Photos From Phone to Computer Without USB
If your USB cable is unavailable, you still have several options.
Using Google Photos
Upload or back up your phone photos to Google Photos and download them from the same account on your computer.
Using iCloud
For iPhone users, iCloud Photos can synchronize pictures across supported Apple devices and computers.
Using Wireless Sharing
Supported Android and Windows devices may be able to transfer selected pictures wirelessly.
Using Cloud Storage
Services such as Google Drive, OneDrive, or Dropbox can be used to upload photos from the phone and download them on the computer.
For a handful of pictures, cloud storage is easy. For a very large collection, check the available cloud storage and your internet connection before starting.
How to Transfer Photos From Android to Windows 10 or Windows 11
Windows 10 and Windows 11 can both access Android phones through USB, although the exact prompts may vary.
For the most reliable workflow:
- Connect the Android phone.
- Unlock it.
- Select File Transfer when the USB notification appears.
- Open File Explorer.
- Select This PC.
- Open the phone.
- Browse to DCIM and other relevant folders.
- Copy the photos.
- Paste them into a dedicated folder on your PC.
It is a good idea to create folders such as:
Phone PhotosPhone Photos 2026Vacation PhotosCamera Backup
Organizing photos during transfer can make future searches much easier.
How to Transfer Photos From iPhone to Windows 10 or Windows 11
For an iPhone, the Windows Photos app provides an easy import route.
If the iPhone is not detected:
- Unlock the iPhone.
- Reconnect the cable.
- Check for the trust prompt.
- Try another USB port.
- Try another compatible data cable.
- Restart both devices if necessary.
- Check whether Windows recognizes the iPhone in File Explorer.
- If the issue continues, check for available Windows and Apple software updates.
Do not repeatedly reset the iPhone simply because Windows cannot detect it. A reset can introduce unnecessary risk and is not normally the first troubleshooting step.
Things to Check Before Trying Advanced Solutions
Before changing drivers, reinstalling software, or modifying device settings, perform these simple checks.
Check the USB Cable
Not every USB cable provides the same data capability. If the phone charges but the computer cannot access it, try a known-good data cable.
Unlock the Phone
Many phones restrict access while locked. Unlock the device immediately after connecting it.
Check the USB Mode
On Android, look for the USB notification and make sure the connection is set to file transfer rather than charging only.
Check Available Computer Storage
A large photo library can consume many gigabytes. Make sure the destination drive has enough free space.
Check the Phone’s Storage
If the phone itself is almost full, some cloud synchronization or camera operations may behave differently.
Test With a Small Number of Photos
Do not start with 20,000 pictures if you are unsure whether the connection works. Copy five or ten images first and verify them.
Common Mistakes to Avoid
Deleting Photos Immediately After Copying
Copying files does not automatically prove that every picture transferred correctly.
Open several images on the computer before removing them from the phone.
Moving Instead of Copying
When creating a backup, use Copy rather than Move. This keeps the originals on the phone until you have verified the backup.
Disconnecting During a Transfer
Do not unplug the phone while files are being copied. Interrupting a transfer can leave incomplete files.
Using a Nearly Full Computer Drive
Large photo collections require substantial storage. Check free space before beginning.
Assuming Every Photo Is in the DCIM Folder
Camera pictures commonly appear there, but screenshots, downloads, edited images, and app-created pictures may be elsewhere.
Confusing Cloud Backup With Local Backup
A cloud library and a physical folder on your computer serve different purposes. If you want a local backup, make sure the files have actually been downloaded to the computer.
Transferring Everything Without Organization
Dumping years of photos into one folder can make them difficult to manage later. Consider creating folders by year, event, or device.
What to Do If Your Computer Does Not Recognize Your Phone
If your phone is charging but does not appear on the computer, work through these steps in order:
- Disconnect the phone.
- Unlock it.
- Reconnect it.
- Check the USB notification or trust prompt.
- Select the appropriate file-transfer option on Android.
- Try a different USB port.
- Try a different data-capable cable.
- Restart the phone and computer.
- Check whether another computer detects the phone.
- If necessary, check for relevant device or system updates.
If the phone works with another computer, the problem may be related to the original computer’s software, drivers, USB ports, or configuration.
If no computer recognizes the phone and the cable has been tested, the phone’s charging/data port may require inspection.
When to Get Professional Help
Most photo transfers do not require a technician. However, professional assistance becomes more appropriate when the problem involves potential data loss or hardware failure.
Consider professional help if:
- The phone contains irreplaceable photos and is physically damaged.
- The phone cannot power on.
- The storage is failing.
- The device repeatedly disconnects during file transfers.
- A damaged charging/data port prevents communication.
- Photos have disappeared and are not available in the expected backup.
- The computer cannot read a storage device containing an important photo backup.
If the photos are extremely important, avoid repeatedly experimenting with questionable recovery tools. Additional writes to failing storage can sometimes make data recovery more difficult.
Frequently Asked Questions
How to Transfer Photos From Phone to Computer Without a Cable?
You can use Google Photos, iCloud, cloud storage, or supported wireless sharing tools. Google Photos is convenient when your pictures are already backed up, while wireless sharing can be useful for smaller groups of photos.
How Do I Transfer Photos From Android to a Windows PC?
Connect the Android phone with a data-capable USB cable, unlock it, select File Transfer from the USB options, then open File Explorer and browse to the phone’s storage. Camera photos are commonly found under DCIM > Camera.
How Do I Transfer Photos From iPhone to Windows?
Connect the unlocked iPhone using a compatible USB cable, approve the trust prompt if it appears, and use the Windows Photos app to import pictures. You can also check File Explorer for available iPhone storage.
Why Is My Phone Charging but Not Showing Up on My Computer?
The cable may support charging but not data transfer, or the phone may be set to charging-only mode. Unlock the phone, try another cable and USB port, and check the phone’s USB settings.
Can I Transfer Thousands of Photos at Once?
Yes, but the best method depends on the devices and available storage. A USB connection can be practical for a large local transfer, while cloud synchronization can be convenient when you want access across multiple devices. For very large transfers, organize the photos into manageable batches and verify the copied files.
Where Are My Android Photos Stored?
Camera photos are commonly stored in DCIM/Camera, but screenshots, downloads, edited images, and pictures from applications may be stored in other folders.
Will Transferring Photos Delete Them From My Phone?
Normally, copying photos to a computer does not delete the originals. However, make sure you choose Copy rather than Move, and verify the computer copies before deleting anything from the phone.
Is USB Faster Than Cloud Storage for Photos?
A USB transfer can be more practical for a large local photo collection because it does not require uploading the entire library to the internet first. Cloud storage is more convenient when you want remote access or do not have a suitable cable.
Final Thoughts
Learning How to Transfer Photos From Phone to Computer gives you a simple way to protect important memories, free phone storage, and manage pictures more comfortably.
For a large collection, start with a USB connection. Android users can generally select the file-transfer USB mode and copy photos from the phone’s storage, while iPhone users can import pictures through Windows Photos or the Mac Photos app.
If you do not want to use a cable, Google Photos, iCloud, cloud storage, and compatible wireless sharing options provide useful alternatives.
The safest approach is to copy rather than move, verify several transferred pictures, and only delete the originals after you are confident that your backup is complete. If a phone is damaged or the photos are irreplaceable, stop experimenting before attempting risky recovery procedures and consider professional assistance.